
Deploying to Your Home Server from GitHub Actions Without SSH
In my previous post, I shared how I run my own server using an Android TV box with Armbian and Cloudflare Zero Trust. While this setup works great for serving applications to the internet, I quickly ran into another challenge: how do I deploy updates from GitHub Actions?
The Deployment Problem
Traditional deployment workflows rely on SSH access to push code and run commands on your server. Tools like rsync, scp, or GitHub Actions plugins like appleboy/ssh-action all assume you can directly SSH into your server.
But here’s the catch: my server doesn’t have a public IP address.
Why SSH Deployment Doesn’t Work
When your server is behind Cloudflare Zero Trust tunnels:
- There’s no direct SSH access from the internet
- The tunnel only exposes HTTP/HTTPS endpoints
- Traditional
drone-scpor SSH-based GitHub Actions can’t reach your server - You can’t use standard deployment tools that rely on SSH
This left me stuck. How could I automate deployments when my CI/CD pipeline can’t SSH into my server?
The Solution: HTTP-Based Remote Access
After exploring various options, I decided to build my own solution: a lightweight HTTP server that accepts deployment scripts and executes them remotely.
I created http-remote-access, a simple yet powerful tool that bridges the gap between GitHub Actions and your home server.
How It Works
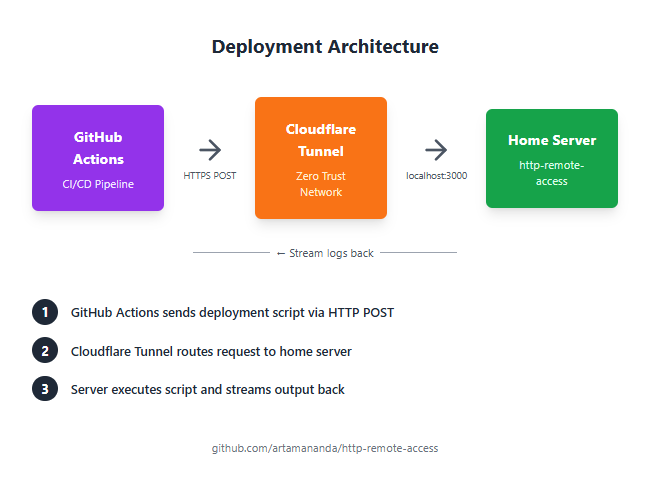
The concept is straightforward:
- Install the HTTP server on your home server (the one behind Cloudflare tunnel)
- Expose the HTTP endpoint through your Cloudflare tunnel
- Send deployment scripts from GitHub Actions via HTTP POST requests
- Stream the output back to GitHub Actions logs in real-time
Setting Up HTTP Remote Access
Step 1: Install on Your Server
First, install the http-remote-access server on your home server:
# Clone the repository
git clone https://github.com/artamananda/http-remote-access.git
cd http-remote-access

# Install dependencies (adjust based on your language/framework)
npm install

# Configure your server
cp .env.example .env
# Edit .env to set your authentication token
Step 2: Configure Authentication
Security is crucial since this tool executes arbitrary commands. Set up a strong authentication token:
# .env file
AUTH_TOKEN=your-super-secret-token-here
PORT=3000
Step 3: Run the Server
Start the HTTP server:
# Using a process manager like PM2
pm2 start server.js --name deployment-server

# Or using systemd for auto-restart
sudo systemctl enable deployment-server
sudo systemctl start deployment-server
Step 4: Expose via Cloudflare Tunnel
Add a new route in your Cloudflare Zero Trust dashboard:
Subdomain: deploy.yourdomain.com
Service: http://localhost:3000
Now your deployment endpoint is accessible at https://deploy.yourdomain.com
Using It in GitHub Actions
Here’s how to integrate this into your CI/CD pipeline:
Basic Deployment Workflow
name: Deploy to Home Server

on:
  push:
    branches: [main]

jobs:
  deploy:
    runs-on: ubuntu-latest

    steps:
      - name: Checkout code
        uses: actions/checkout@v3

      - name: Deploy to server
        env:
          DEPLOY_TOKEN: ${{ secrets.DEPLOY_TOKEN }}
          DEPLOY_URL: ${{ secrets.DEPLOY_URL }}
        run: |
          curl -X POST $DEPLOY_URL             -H "Authorization: Bearer $DEPLOY_TOKEN"             -H "Content-Type: application/json"             -d '{
              "script": "cd /var/www/myapp && git pull origin main && npm install && pm2 restart myapp"
            }'
Advanced: Multi-Step Deployment with Output Streaming
name: Advanced Deployment

on:
  push:
    branches: [main]

jobs:
  deploy:
    runs-on: ubuntu-latest

    steps:
      - name: Checkout code
        uses: actions/checkout@v3

      - name: Build application
        run: |
          npm install
          npm run build

      - name: Deploy to server
        env:
          DEPLOY_TOKEN: ${{ secrets.DEPLOY_TOKEN }}
          DEPLOY_URL: ${{ secrets.DEPLOY_URL }}
        run: |
          # Multi-line deployment script
          SCRIPT=$(cat <<'EOF'
          set -e
          echo "Starting deployment..."

          # Navigate to app directory
          cd /var/www/myapp

          # Pull latest changes
          echo "Pulling latest code..."
          git pull origin main

          # Install dependencies
          echo "Installing dependencies..."
          npm ci --production

          # Run database migrations
          echo "Running migrations..."
          npm run migrate

          # Restart application
          echo "Restarting application..."
          pm2 restart myapp

          echo "Deployment completed successfully!"
          EOF
          )

          # Send script to server
          curl -X POST $DEPLOY_URL             -H "Authorization: Bearer $DEPLOY_TOKEN"             -H "Content-Type: application/json"             -d "{"script": $(echo "$SCRIPT" | jq -Rs .)}"
Key Features
1. Real-Time Output Streaming
The tool streams command output back to GitHub Actions in real-time. This means:
- You see logs as they happen
- Errors are immediately visible
- No waiting for the entire script to complete before seeing results
2. Error Handling
If a command fails, the HTTP response includes:
- Exit code
- Error output
- Stack trace (if applicable)
This makes debugging deployment issues straightforward.
3. Security Considerations
The tool implements several security measures:
- Token-based authentication: Only authorized requests can execute commands
- HTTPS only: All traffic goes through Cloudflare’s encrypted tunnel
- Command validation: Optional whitelisting of allowed commands
- Rate limiting: Prevents abuse
4. Flexibility
You can deploy:
- Web applications
- Docker containers
- Database migrations
- Static sites
- Background services
- Any command-line workflow
Example: Complete Deployment Setup
Here’s a real-world example for a Node.js application:
Server Setup (/etc/systemd/system/deployment-server.service)
[Unit]
Description=HTTP Deployment Server
After=network.target

[Service]
Type=simple
User=deploy
WorkingDirectory=/opt/http-remote-access
ExecStart=/usr/bin/node server.js
Restart=always
Environment=NODE_ENV=production

[Install]
WantedBy=multi-user.target
GitHub Actions Workflow
name: Deploy Production

on:
  push:
    branches: [main]
    paths:
      - 'src/**'
      - 'package.json'

jobs:
  test:
    runs-on: ubuntu-latest
    steps:
      - uses: actions/checkout@v3
      - name: Run tests
        run: |
          npm install
          npm test

  deploy:
    needs: test
    runs-on: ubuntu-latest
    steps:
      - name: Deploy to production
        env:
          DEPLOY_TOKEN: ${{ secrets.DEPLOY_TOKEN }}
          DEPLOY_URL: ${{ secrets.DEPLOY_URL }}
        run: |
          curl -X POST $DEPLOY_URL             -H "Authorization: Bearer $DEPLOY_TOKEN"             -H "Content-Type: application/json"             -d '{
              "script": "cd /var/www/myapp && git pull && npm ci && npm run build && pm2 reload myapp --update-env"
            }'             --fail             --silent             --show-error
Advantages Over Traditional SSH Deployment
| Aspect | SSH-Based | HTTP Remote Access |
|---|---|---|
| Requires Public IP | Yes | No |
| Works with Cloudflare Tunnel | No | Yes |
| Setup Complexity | High (keys, ports) | Low (single endpoint) |
| Real-time Logs | Limited | Full streaming |
| Firewall Friendly | Often blocked | HTTPS always allowed |
| Authentication | SSH keys | Bearer tokens |
Security Best Practices
When using this deployment method:
- Use strong tokens: Generate cryptographically secure tokens
- Limit script scope: Don’t run as root; use a dedicated deployment user
- Enable HTTPS only: Never expose the HTTP endpoint directly
- Implement rate limiting: Prevent brute force attempts
- Audit logs: Keep track of all deployment executions
- Use GitHub Secrets: Never commit tokens to your repository
Troubleshooting Common Issues
Deployment script fails silently
Solution: Add set -e at the start of your script to exit on first error:
set -e
echo "This will stop if it fails"
Can’t see real-time output
Solution: Ensure your curl command doesn’t buffer output:
curl -X POST $DEPLOY_URL --no-buffer ...Authentication errors
Solution: Verify your token matches on both ends:
# Test your token
curl -X POST $DEPLOY_URL
  -H "Authorization: Bearer $DEPLOY_TOKEN"
  -d '{"script": "echo test"}'
Future Improvements
I’m planning to add:
- Web UI for manual deployments
- Deployment history and rollback capabilities
- Multi-server support for deploying to multiple instances
- Webhook support for other CI/CD platforms
- Built-in secret management
Conclusion
Running a home server without a public IP doesn’t mean you have to sacrifice modern deployment workflows. With http-remote-access, you can:
✅ Deploy from GitHub Actions seamlessly
✅ See real-time logs and errors
✅ Maintain security with token authentication
✅ Avoid SSH complexity and firewall issues
✅ Keep your automation simple and reliable
The tool is open source and available at github.com/artamananda/http-remote-access. Feel free to contribute, report issues, or suggest improvements!
Get Started
- Clone the repository:
git clone https://github.com/artamananda/http-remote-access.git - Follow the setup guide in the README
- Configure your GitHub Actions workflow
- Deploy with confidence!
Have questions or suggestions? Feel free to reach out if you have any questions or feedback!